Sunday, November 13, 2011

Marble Slab for Tempering Chocolate

Recently, Linda, a co-hostess in Blackfoot, Idaho, requested that I do a chocolate demonstration as a surprise for her co-hostesses and guests.  Ordinarily, this is not something that is part of a Lindt Chocolate R.S.V.P. tasting party... but Linda was charming, and she and Nancy and Shiela were working hard together to make this a fabulous holiday party for their friends, so I agreed.

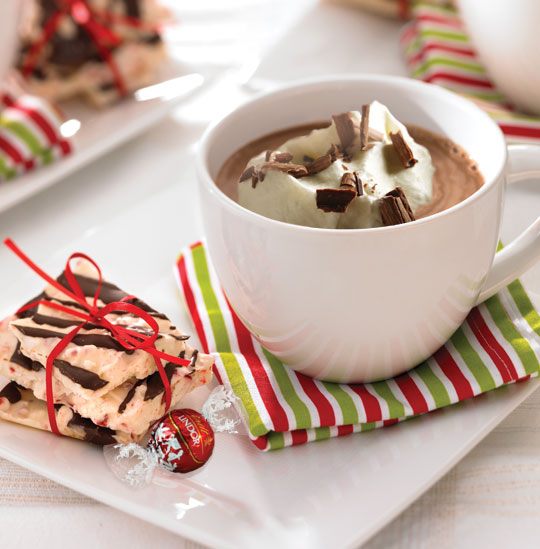
She requested White Chocolate Bark with Peppermint and Dark Chocolate Drizzle from the "Lindt Chocolate Passion" cookbook.  As shown in the promo photo below on the left side of the hot chocolate.
Beautiful, isn't it?  (It's very tasty, too - and I'm not much of a peppermint fan!)  It's a three ingredient recipe.  Four bars of Lindt Swiss Classic White Chocolate, chopped; one cup of Star mints (individually wrapped red & white peppermints), crushed; and 1/2 bar Lindt Bittersweet Chocolate.  Sounds easy enough, right?  I thought so too, until I read the first bullet point under Method, which reads:
"Temper the chocolate according to the instructions on pages 40-43."  (Ought Oh!)


I quickly realized that
     1.  I have never tempered chocolate before, and
     B. I was going to need a marble slab in order to do this the traditional way.

So, I went to work researching the internet.  I had always wanted a marble slab as I knew they were a fabulous piece of kitchen equipment for pastry, candy making, and now, tempering chocolate.  I also knew they were expensive.  Sure enough, my research presented me with options ranging from $55 to $300, and that was without shipping!  (Have you ever picked up a marble slab before?  Can you say huff and puff?)  Sizes of these "marble pastry boards" ranged from 12"x12" to 18"x20".

My brilliant hubby to the rescue!  He took me for a little ride to Idaho Granite and Stone where I (sheepishly) asked Katie if anyone ever came in asking about smaller pieces for candy making.  She put me at ease immediately.  Katie says it's common for people to ask, especially as the holidays approach.  Anticipating people like me, they had some pieces cut in advance!
So here is the lovely 20"x20" marble slab we chose!  The best part?  $20.00  She even gave the stone a spritz of sealant and supplied us with little rubber buttons to apply to the bottom.

The back of the stone had some rough fibers on it, which we scraped off with a heavy duty window razor scraper.  My husband, the tool perfectionist, took a little sandpaper to the edges and smoothed away the rough spots, then applied the rubber buttons.  (A friend suggested that felt discs work well also.)

When you go, tell Katie that the Lindt Lady sent you!

Idaho Granite & Stone
Katie Sivill, In-House Designer
3353 N. 25th E.
Idaho Falls, ID  83401
(208) 552-3225

PS.  The demonstration went very well, and guests were impressed when I packaged a few pieces in a cello bag and sent it home with them. :)

Oatmeal Sablé from Lindt Chocolate Passion Cookbook

I love these cookies!  I describe them as a cross between the traditional homemade Dutch cookies that I make during the holidays, and a white chocolate macadamia nut cookie.  I don't even miss the macadamia nuts!  The best thing is that they are so darn easy to make, and the dough can be made in advance and kept in the refrigerator until you are ready to bake up a batch!

Pronounced "sah-blay", the traditional recipe does not contain oatmeal, and is rolled in sugar before it is baked. 

Cream together:
1 cup plus 1 Tablespoon of butter, softened
1 cup powdered sugar
1 teaspoon vanilla extract
Add and mix until well combined:
1 2/3 cup flour
3/4 cup oats
1 Tablespoon baking powder
Stir in 1/2 bar Lindt Swiss Classic White Chocolate, chopped
Roll the dough into a log shape, wrap in plastic, and refrigerate at least 30 minutes.
Preheat oven to 350 degrees Fahrenheit.
Cut cookies approximately 1/4 inch thick and place them on a baking tray lined with parchment paper.
(I just lightly greased the cookie sheet, and it worked fine.)
Bake 15-20 minutes or until cookies just begin to brown slightly at the edges.
Cool on a wire rack.
The recipe suggests melting milk or white chocolate and drizzling over the top of the cookies.  Good luck getting that done before the family begins consuming them!  Instead, I served them with a couple of delicious Lindt Orange Milk Thins!