Recently, Linda, a co-hostess in Blackfoot, Idaho, requested that I do a chocolate demonstration as a surprise for her co-hostesses and guests. Ordinarily, this is not something that is part of a Lindt Chocolate R.S.V.P. tasting party... but Linda was charming, and she and Nancy and Shiela were working hard together to make this a fabulous holiday party for their friends, so I agreed.
She requested White Chocolate Bark with Peppermint and Dark Chocolate Drizzle from the "Lindt Chocolate Passion" cookbook. As shown in the promo photo below on the left side of the hot chocolate.
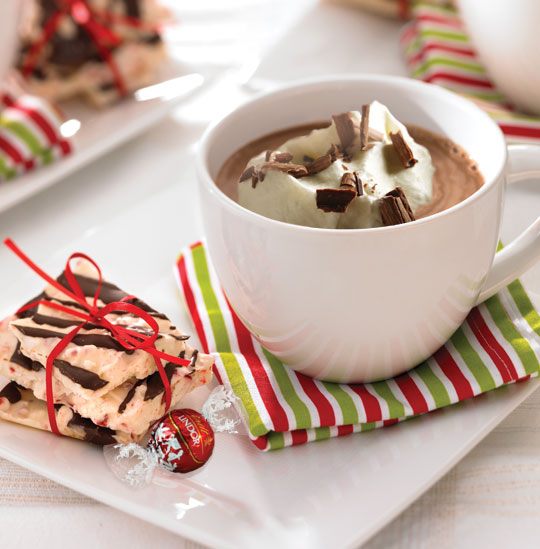
Beautiful, isn't it? (It's very tasty, too - and I'm not much of a peppermint fan!) It's a three ingredient recipe. Four bars of Lindt Swiss Classic White Chocolate, chopped; one cup of Star mints (individually wrapped red & white peppermints), crushed; and 1/2 bar Lindt Bittersweet Chocolate. Sounds easy enough, right? I thought so too, until I read the first bullet point under Method, which reads:
"Temper the chocolate according to the instructions on pages 40-43." (Ought Oh!)
I quickly realized that
1. I have never tempered chocolate before, and
B. I was going to need a marble slab in order to do this the traditional way.
So, I went to work researching the internet. I had always wanted a marble slab as I knew they were a fabulous piece of kitchen equipment for pastry, candy making, and now, tempering chocolate. I also knew they were expensive. Sure enough, my research presented me with options ranging from $55 to $300, and that was without shipping! (Have you ever picked up a marble slab before? Can you say huff and puff?) Sizes of these "marble pastry boards" ranged from 12"x12" to 18"x20".
My brilliant hubby to the rescue! He took me for a little ride to Idaho Granite and Stone where I (sheepishly) asked Katie if anyone ever came in asking about smaller pieces for candy making. She put me at ease immediately. Katie says it's common for people to ask, especially as the holidays approach. Anticipating people like me, they had some pieces cut in advance!
So here is the lovely 20"x20" marble slab we chose! The best part? $20.00 She even gave the stone a spritz of sealant and supplied us with little rubber buttons to apply to the bottom.
The back of the stone had some rough fibers on it, which we scraped off with a heavy duty window razor scraper. My husband, the tool perfectionist, took a little sandpaper to the edges and smoothed away the rough spots, then applied the rubber buttons. (A friend suggested that felt discs work well also.)
When you go, tell Katie that the Lindt Lady sent you!
Idaho Granite & Stone
Katie Sivill, In-House Designer
3353 N. 25th E.
Idaho Falls, ID 83401
(208) 552-3225
PS. The demonstration went very well, and guests were impressed when I packaged a few pieces in a cello bag and sent it home with them. :)
As a Lindt Chocolate R.S.V.P. Independent Consultant, I get to "Mix Business with Decadent Pleasure." I hope you'll enjoy my blog posts as I share my adventures with premium chocolate. If you would like to learn more about the Lindt Chocolate R.S.V.P. Consultant Business Opportunity, purchase premium chocolate, or host a party, please visit my website at www.mylindtchocolatersvp.com/debrapalmer
Showing posts with label chocolate. Show all posts
Sunday, November 13, 2011
Tuesday, September 27, 2011
Classic Chocolate Brownies - A Recipe From "Lindt Chocolate Passion"
This was my first attempt at cooking with premium chocolate from Lindt.
Usually, I like making a recipe a week or so in advance of a party and use my family
as guinea pigs to test it out. I require my hostesses to take a leap of faith
and make it for their guests at a Lindt Chocolate R.S.V.P. chocolate tasting party.
So, here I am demonstrating how easy it is, as I prepare for my own launch party!
"Preheat oven to 350 degrees Fahrenheit. (180 degrees Celsius)
Grease an 8x8 inch square baking pan and line with parchment paper. "
(I have to be honest - I never spring for the parchment paper,
and my recipes always turn out great without it.)
Begin by chopping 3 bars (3.5oz/100g)
one version of this recipe calls for three Swiss Bittersweet bars
another version calls for two bittersweet and one Excellence 70% Cocoa bars
yet one more version calls for three Excellence 70% Cocoa bars
I made two batches of brownies, to the first verson I added walnuts,
and to the second version I omitted the nuts.
"Melt the chopped chocolate and 1/3 cup butter in a sauce pan or double boiler
over low heat. Stir constantly. Remove from the heat and let cool slightly."
In this step, I melted the butter seperately in the microwave first. Since I don't own a fancy (and expensive!) double boiler, I put a glass bowl over a simmering pot of water on the stove to melt the chocolate. Once the chocolate had cooled slightly, I stirred the butter into the chocolate.
"Beat together the eggs, sugar, vanilla, and salt until well combined."
"Add the melted chocolate, and beat gently by hand
or on a low setting on a mixer until evenly incorporated."
"Add the flour and walnuts, and mix until just combined."
(Don't use the mixer to combine the flour with the liquids when making brownies.
It's important not to overmix. Stir just until the ingredients are combined.)
"Pour the mixture into the prepared pan and bake approximately 20 minutes."
Don't forget to enjoy the spatula and the beaters!
**Disclaimer: We raise our own chickens, using the very freshest eggs,
so no worries about salmonella here!**
Yes, my oven needs to be cleaned because I use it. Frequently.
Oh, yeah, don't those brownies look good?!
Yield: Approx. 25 small brownies
Cooking with Lindt Chocolate has opened up a whole new world of baking to me!
Here is my challenge, right from the Lindt chocolate R.S.V.P. Catalog:
"Start Traditions That Create Lasting Memories."
Lindt chocolates are the perfect ingredient.
Subscribe to:
Posts (Atom)


